Product Description
Easiest way to test a Subaru!
Boost leak test at the turbo intake pipe that is right after the maf housing and save yourself time and hassle from getting to the turbo inlet flange. Avoids removing the intake to access the turbo as it sits underneath the manifold and is difficult to access. It is always recommended to remove the oil cap during testing as the object of the test is to check the charge pipes for leaks and assure the turbo will run healthy by not over-spinning to compensate for a boost leak. Keeping the crank system sealed by keeping the oil cap on will pressurize the crankcase and not recommended in these vehicles.
Check out the write-up on an STI (very similar to WRX) here: https://turboboostleaktesters.com/how-to-boostleak-test-a-subaru/
Application:
- Subaru Impreza WRX upto 2003
Design Features:
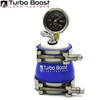
- Durable Plastic End Cap with 1/8" NPT threaded gauge port & fitting port
- High quality silicon coupler
- 30 PSI / 2 Bar Boost Gauge
- 30 PSI range will give you the appropriate reading when testing your charge pipes for low, medium or high boost levels.
- Universal Tire Schrader Valve or 1/4" NPT Milton Type Compressor fitting - choose option
- (2) Stainless Steel T-Bolt Clamps with Teflon lock-nut
Lifetime warranty on gauge, end cap, silicon and fitting. Excludes t-bolt clamps
Common Issues:
- Faulty charge air coolers (leaking through various cracks)
- Intake Manifold cracks
- Turbocharger outlet pipe leak
- Charge air cooler piping
- clamped connections
- divertor valve leaks from diaphragm or boost lines
How do I know if I have a Boost Leak?? Common Symptoms are:
- P-codes, Check engine lights, system too rich
- Loss of power
- Poor Fuel Mileage
- Typically the boost target will be lower than what is expected by the tune
- Boost onset could be erratic
- Slower than normal spool-up
What happens to the turbo charger if there is a boost leak??
Any leak will cause the turbos wheels to over-spin and result in bearing to wear out eventually causing shaft play! This happens faster with larger leaks. This conditions then allows for the turbos wheel tips to make physical contact with the turbo housing. Its over for your turbo at that point!
Simple Steps to Use the Boost Leak Tester:
- Remove the intake hose/pipe off your turbo chargers inlet
- Install the boost leak tester onto the turbo chargers inlet and secure with the T-bolt clamps
- Pressurize the boost leak tester with an air compressor and a tire inflation tool. The air compressor should be a minimum of 2 gallon volume. The larger the compressor, the more capacity you have to fill the engines charge pipes. A bike pump or electric pump will not supply enough air fast enough to fill the system
- *Caution! - When filling the system, start with a low pressure around 5 PSI. Recommended to regulate the compressor to a lower pressure and only increase if filling is too slow. The boost gauge reading indicates how much compressed air is in the charge pipes. The boost gauge allows you to read the bleed rate of charge pipes when you remove the pressure. It is normal to see pressure loss average of 1psi every second. Faster bleed rate at higher pressures and slower bleed rate at lower pressures
- Listen for leaks. Use soapy spray if necessary to identify smaller leaks.
- Fix any leaks points and then retest. Increase by 5psi up to the normal operating boost pressure.
- Go out and Boost! Enjoy the restored power from your engine!


